- Submissions

Full Text
Significances of Bioengineering & Biosciences
Design and Manufacture of Dental Light Cure: Review on Biomaterial and the Effect of Wavelength on Composites Materials
Hamidreza Shirzadfar1*, Mohammad Hosein Haji Noroozi1,2 and Mojtaba Janghorban2
1Department of Electrical and Biomedical Engineering, Faculty of Engineering and Technology, Shahid Ashrafi Esfahani University, Iran
2Alborz Danesh Technology Innovation Park (FANAD), Iran
*Corresponding author:Hamidreza Shirzadfar, Department of Electrical and Biomedical Engineering, Faculty of Engineering and Technology, Shahid Ashrafi Esfahani University, Isfahan, Iran
Submission: October 23, 2024; Published: November 05, 2024

ISSN 2637-8078Volume7 Issue1
Abstract
By replacing the use of various composites instead of amalgam, dental light cure is an integral part of restorative treatments. In the case of dental caries, it is very common to fill the space of the teeth with composite. Today, the clinical use of composite resin has increased. Due to the increasing use of optical composites, the importance of sufficient polymerization increases because their success depends on the degree of polymerization. Incomplete polymerization causes adverse biological effects, increasing water absorption, composite solubility and decreasing hardness. This is where the use of light cure devices in dental restorations is proposed. In the research conducted, light cure is designed with normal electronic elements and a very simple user interface by emitting blue light (cold visible) by high power and wavelength LEDs. Specific (400 to 520nm) performs the composite cure well in three different working modes.
Introduction
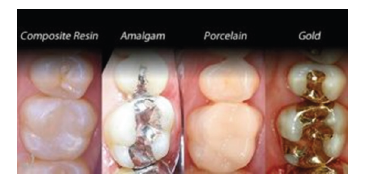
By replacing the use of various composites instead of amalgam, Dental light cure is an integral part of restorative treatments. In the case of tooth decay, it is very common to fill the tooth space with composite. Today, the clinical use of composite resin has increased. Due to the increasing use of optical composites, the importance of sufficient polymerization increases because their success depends on the amount of polymerization. Incomplete polymerization causes adverse biological effects, increasing water absorption, composite solubility and decreasing hardness. This is where the use of light cure devices in dental restorations is proposed. Also, due to the wide use of these materials for bonding, insufficient the presence of light can affect the bond strength of restorations. If you have visited the dentist for various types of restorative work, you will definitely not be aware of the use and practicality of this tool and we can confidently say that this tool is one of the most important and widely used devices in dental offices. Light cure is made from two words (Light) and (Cure) and is generally used for light therapy (Figure 1) [1].
Figure 1:Innovations and applications of biocompatible materials in restorative dentistry [1].
Current composites are initially paste-like and are called optical composites because they start to harden when exposed to light. This composite is made of a mixture of monomers that turn into a polymer when exposed to light. These composites can be first in paste form so that the dentist can easily fill the tooth cavity and give it the desired shape and then harden it with the light cure device. But the light produced by the light cure device is a visible light with a blue or purple spectrum, but with high power and be careful. It does not have any ultraviolet or laser light and also it does not have any harmful light for the patient. That is why its penetration power in the composite is only 2mm and for this reason when working with composite, the dentist should use composite in layers. When the dentist uses a layer of about 2mm, it should be used the light cure for about 20 to 30 seconds and then put another layer to cover the layers below.
For the design and construction of proposed devices, various challenges such as equipment, research, effectiveness and economic justifications have been considered.
The general goals of this plan include:
A. The first phase: Research on similar samples, considering the
results of the work, its advantages and disadvantages.
B. The second phase: Study, research and review the existing
challenges.
C. The third phase: Design and fabricate the prototype and
testing the electronic parameters.
D. The fourth phase: Test and final check the performance and
effectiveness of dental composites.
E. Fifth phase: Optimization and industrialization of the light
cure device.
Review on Biomaterial in Dentistry
Biomaterials play an important role in tissue engineering [2- 8]. Biomaterials are used to build frameworks called scaffolds, matrices or constructs, which are interconnected porous structures that create a cellular microenvironment required for optimal tissue regeneration. Several natural and synthetic biomaterials have been used to construct tissue engineering scaffolds. Among different biomaterials, polymers are the most tested and used. They can be designed to provide good, interconnected porosity, large surface area, sufficient mechanical strength, different surface properties and different geometries required for tissue regeneration. However, one material type may not meet all requirements. Selection of two or more biomaterials, optimization of their physical, chemical and mechanical properties and advanced fabrication techniques are required to obtain scaffold designs intended for their final application. The current focus is on designing biomaterials such that they replicate the local extracellular environment of the native organ and enable the micro-level cell-cell and cell-scaffold interactions required for functional tissue regeneration [9]. This article provides an insight into the various biomaterials available and the emerging use of nanoengineering principles to construct bioactive scaffolds in tooth regeneration [9].
Every year, a large number of teeth are lost due to tooth decay, trauma or periodontal diseases. Restoring missing teeth or their components is a dream for every dental professional. Tissue engineering is one of the emerging fields of medicine, which is basically based on the combination of stem cells, growth factors and scaffolds to regenerate diseased or lost tissues. The contribution of scaffolds to tissue regeneration is essential because they act as carriers to facilitate the delivery of stem cells and/or growth factors at a local receptor site. Scaffold biomaterials can be classified as natural or synthetic, rigid or non-rigid and degradable or nondegradable [10]. Polymers are the most widely used biomaterials for making scaffolds, and their different characteristics are attributed to differences in the composition, structure and arrangement of their constituent macromolecules [11,12]. Current research is mainly directed towards tuning the design features of biomaterials such that precisely directed, coordinated, timed and spatial interactions between EMSCs and the scaffold matrix are encouraged [13].
Materials and Methods
In the past, one of the countless reasons people went to the dentist was broken and empty teeth; Dentists used a material called amalgam to fill and repair these teeth, this material brought advantages and disadvantages; one of its advantages is its strength and stability for a long time, but one of its disadvantages is that it gives a bad effect to the teeth. With the introduction of composite materials, the use of amalgam decreased.
Composite materials
Composite is actually the same material that is used to fill teeth.
Composite materials are in the form of paste and are the same color
as the teeth, a thin layer of which is placed on the surface of the
tooth and is shaped. Composites are resin materials that are placed
in different categories according to the number and size of their
particles and have different applications. In general, composite
materials can be divided into four groups.
a) Hybrid type composite
b) Micro field composite
c) Nano field composite
d) IPS veneers.
Each of these composites has its own uses, because in the front teeth, beauty and shine are important factors, and in the back teeth, having enough strength to withstand chewing forces well. Hybrid type composite: posterior teeth composites have larger particles and more strength and are usually hybrid type.
Micro field composites are used to restore front teeth, which have smaller particles and less strength, but instead leave a smoother, shinier and brighter surface after polishing. The smoother the surface of the composite, the less it will take color and the need for periodic polishing over time. Today, nano field composites are also available in the market so that we can achieve strength and beauty at the same time in tooth restoration.
IPS veneers (or IPS composite): Another type of composite that is newly used are IPS veneers (ceramic composites). Due to having ceramic particles, these composites have higher color stability and strength than the previous generations and have the most similarity in appearance to ceramic laminates. Light cure devices are a different device from laser. But many treatments that are performed with this device can also be performed with a laser device. The laser device has much more diverse and extensive applications in dentistry and every day new aspects of the use of laser technology in dentistry are introduced. Tooth-colored filling materials (composites) are the most common materials that are hardened by the light cure device. There are also composites that are hardened without using this device. In orthodontics, sometimes for gluing orthodontic tools such as brackets, the material used for gluing is strengthened with a light cure device. The important thing is to know that the blue light of any of these dental devices does not pose any danger to us, it is a type of visible (cold) light and therefore it is not a laser beam.
The success of light-curing composite restorations depends on the degree of polymerization and therefore on the intensity of the light output of the light cure device. Sufficient intensity, correct wavelength (400 to 520nm) and sufficient curing time are important variables in sufficient polymerization of composite resins. Various factors affect the intensity of the light output of the device. Due to the increasing use of optical composites, the importance of adequate polymerization increases because their success depends on the degree of polymerization. Incomplete polymerization causes adverse biological effects, increased water absorption, composite solubility and reduced hardness. This is where the use of light cure devices in dental restorations is proposed. Also, due to the wide use of these materials for bonding purposes, insufficient light can affect the bond strength of restorations.
Light cure device design process
For the initial design of Light Cure, similar samples were first studied and examined, as well as its advantages and disadvantages, then the performance of the device was measured taking into account all aspects, the specifications of the device were considered as follows: Light cure must be of LED type, because it has less energy loss compared to halogen type and at the same time lower energy consumption, also the size of the device is much smaller due to the lack of ventilation system. The battery considered for light cure should have high durability and proper charging to meet the needs of the treatment staff in an acceptable period of time. is which can meet the needs of IC as power supply and device display (Figure 2). The program code is written based on c language and AVR microcontroller IC used in AT MEGA 8 device. This type of microcontroller was chosen due to its simpler application and suitable programming (vision code AVR program) also this IC has Being able to perform PWN in the ramp mode of the device without the need for any internal circuit helps to reduce the size of the PCB to a great extent. In general, this IC works like a small computer and the circuit is digital without the need for additional analog circuits that are in other devices. It is designed in the same way as it is used (Figure 3).
Figure 2:Lithium battery of light cure device.
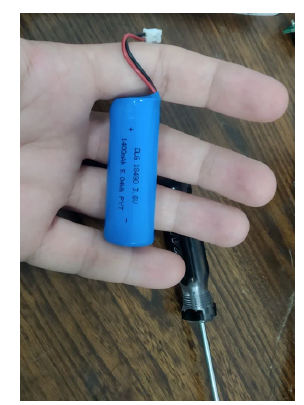
Figure 3:The schematic of light cure guide.
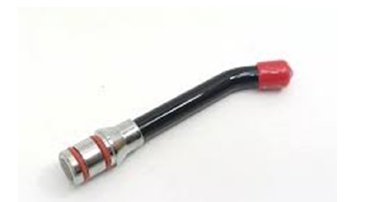
The design of this circuit and its overall structure are made with dimensions close to half of similar samples. The user interface of the device is very simple and can be easily adjusted with three keys, up, down and enter. The application modes of the device include three modes: constant, ramp and pulse. The descriptions of these three modes are given in the previous sections. Light guide This product is a WOODPECKER/DTE model and has a high ability to focus light. The material of the body of the device is high-quality plexiglass, which prevents light reflection to a large extent.
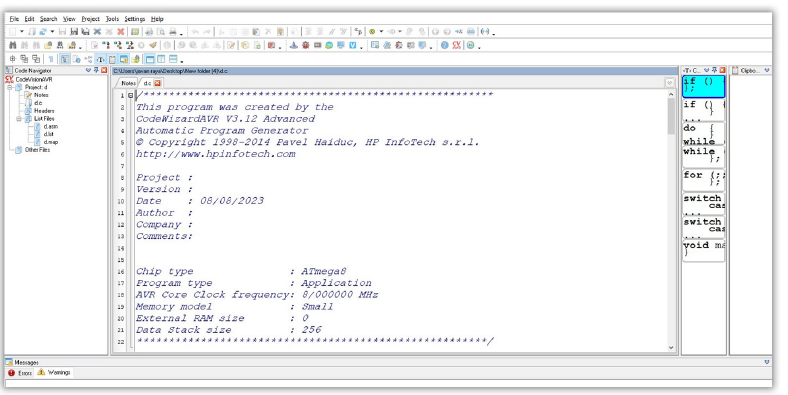
Circuit software simulation: The initial design is simulated by using the Proteus software. In this way, program code is loaded on the IC. Then the display of the keys and other components are simulated and connected to the microcontroller (Figure 4). The coding of the device should be done according to the design done in Proteus and the desired bases should be determined as input and output. The codes of this program are written with the help of the code wizard tool and are fully compatible with the selected micro (Figure 5).
Figure 4:The circued of device simulated on Proteus software.
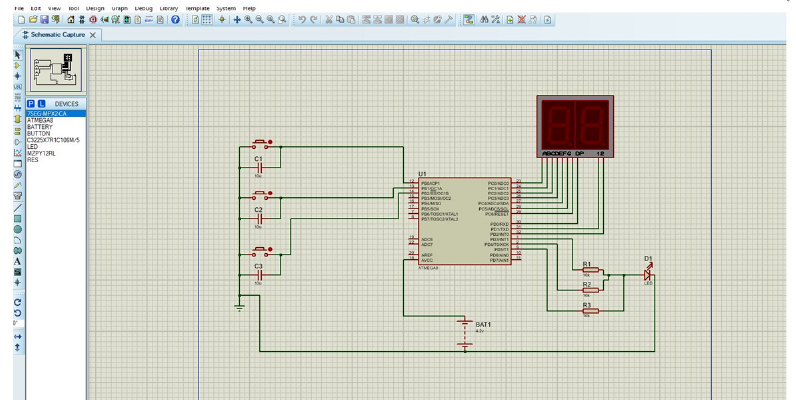
Figure 5:The schematic of microcontroller code in code wizard tool.
Circuit design: After the simulation of final circuit which is simulated and presented in the previous part, the PCB is designed by using the Altium Designer (PCB Design Software). At this stage, important factors such as the dimensions of the circuit, the arrangement of the parts and their footprints must be considered. The Figure 6 shows a view of the printed board.
Figure 6:The PCB design in Altium designer software.
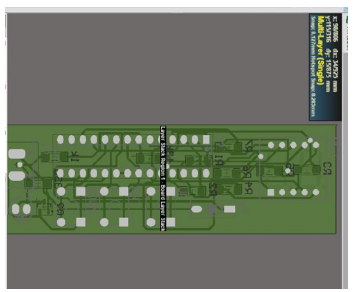
Also, this design is done in two metallized layers, the lines are 0.8mm thick and the dimensions of the board are 2×6cm2.
Preparation of essentials parts and assembly on final PCB
At this stage, first all the necessary parts and components are prepared and then assembled on the board. In the preparation of parts, care must be taken to ensure that: The selected technical information display and its footprint must be exactly the same as the simulated one, because otherwise the signals will not be displayed correctly. The curing LED must also have the right power to keep the right time and quality to perform this operation in the right range. The battery charger module must be compatible with the battery specifications to cut the circuit at the right time during charging and also provide the current required by the battery. In connecting the connecting wires, it must be carefully used with high-quality solder to have proper strength. In micro assembly, we use a special socket to replace it more easily, so that there is no need to remove the tin for each time the program is updated. After the complete assembly of the parts and proper installation, in the last step, we put the programmed micro in its place, also the key to connect the power supply to the circuit or connect the battery must be done after placing the micro. When buying a micro programmer, we must pay attention to the fact that the connection sockets are compatible with the computer system.
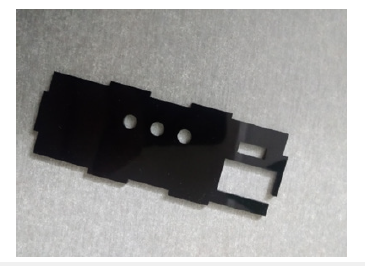
After purchasing the program, we install the corresponding program and load the code written in the code vision on the micro. In the next step, we put the IC into the socket and connect it with the power switch. In functional test stage, the battery charging circuit is tested by connecting the power to the charger with a micro USB cable and when the battery is so-called fully charged, the power connection to the battery must be disconnected. After the battery is charged, turn on the circuit using the dip switch. Then we carefully test and check all the parts of the device, including the user interface keys, the device’s functional modes, the display, the amount of charging and also the intensity of the emitted light. We use a suitable cover to put the product in it. After passing all the tests, it is time to panel the device. For this purpose, due to the high cost of plastic injection, we went to laser-cut dark Plexiglas molds, so we use the six sides of the Plexiglas sheet to make a rectangular cube (Figure 7) after cutting the relevant parts. The charging cable, display, keys and light output are also cut and connected to each other after accurate measurement.
Figure 7:The real view of laser plexiglass cover.
Then the guiding and concentrating part of the light (light guide) is connected to the front of the device exactly along the LED. In final stage of the light cure device preparation, the strength and hardening time of the composite is measured. In this way, the amalgam is placed on the tooth model and the curing process is done with the device, which is also done successfully and with a time of about five seconds. The constant modus operandi was performed well and the dental composite reached the hardened state desired by the dental specialist.
Results
Light cure ingredients usually contain alpha diketone (benzyl or camphoroquinone) as an initiator. Light with sufficient intensity and in a specific range is necessary to bring the alpha diketone to the stimulated state so that the restorative material starts to harden. The dentist should understand that reaching the maximum polymerization of the composite by observing the time recommended by the manufacturer of the device is possible only if the radiation intensity of the device is ideal. During curing, the tip of the device should be placed as close as possible to the restoration to avoid light intensity reduction. The light intensity is inversely proportional to the square of the distance. Therefore, as the distance increases, the polymerization rate of the composite will decrease. The most important features of light cure: Light cure is one of the most important and practical products of every dental office and clinic. For this reason, to buy the right light cure, we must pay enough attention to its specifications. For this purpose, we will examine the most important features of light cure.
One of the most important parameters that can distinguish quality Light Cure from other brands is its output power. Most LED light cures have an output power of more than 1000mW/ cm2. This amount of power output can perform the curing process well. Obviously, if the output power is higher, the time required for curing is reduced. It should also be noted that dental curing lights that have more power also cure more deeply. Therefore, it is necessary to pay attention to the output power of light cure so that the patient is not harmed for too long. The important question here is why the wavelength of light cure is important. The composite materials use different photo initiators. Therefore, different wavelengths are needed to be able to perform the curing process correctly and to a suitable depth. The noteworthy point is that there are different photo initiators even for composites produced by the same company. Therefore, it is very important to pay attention to this feature in order to increase the quality of work and also the satisfaction of patients.
Light cures that use halogen lamps have a wider range of wavelengths. For this reason, they can be used for more materials. In contrast, light cures that use LEDs for curing emit more limited wavelengths. Usually, the wavelength of LED light cure is between 400 and 500nm. According to the contents of this section, it can be concluded that buying light cure with wider wavelengths is more suitable. How to cure composites depends entirely on the dentist. In fact, this is completely a matter of taste. Some start with low output and power and increase it gradually. But some others prefer to do this process with low light cure power. The use of Light Cure’s low output and power prevents the accumulation of consumables. It is also a suitable option for not damaging the tissues. Light cure working modes are programmed not only on output power, but also time is considered as a parameter. One of the most important factors to consider when buying the right light cure is its series. In fact, the light of LED Light Cure should be shone vertically on the tooth to be more effective. The importance of this becomes clear when we compare different teeth in different areas of the tooth. The vertical radiation of LED Light Cure shows the importance of this issue for the molars that are placed at the end of the mouth. For this reason, using different light cure heads with different angles helps a lot in increasing the quality. This also makes it easier to work with the device and cure the tooth. The way light cure is placed in the hand and the ease of working with it is one of the effective factors. Easy access and working with the buttons on light cure will help you in doing the work. The battery life should be such that you don’t need to recharge it during a day. If you use Light Cure a lot, the wireless functionality can be a good choice.
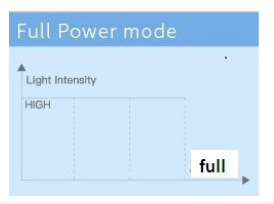
There are generally three working modes for Light Cure:
A. Constant radiation that is emitted with a constant intensity
during illumination (Figure 8).
Figure 8:The constant work mode diagram.
B. Pulse radiation in which the intensity of light increases and decreases and this increase and decrease in intensity is completely alternating (Figure 9).
Figure 9:The pulse work mode diagram.
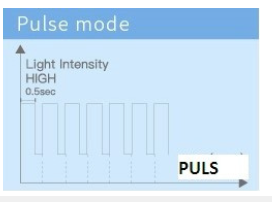
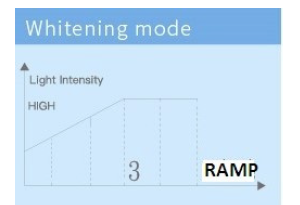
C. Ramp radiation, which starts from a low light intensity and gradually increases with the increase of time (Figure 10).
Figure 10:The diagram of RAMP working mode.
The interior components of light switches include different
parts, which include:
a) Electronic board,
b) Battery,
c) Blue LED 1W,
d) Light guide interface,
e) On and off switch,
f) Time selection switches,
g) Charger socket and
h) Handpiece.
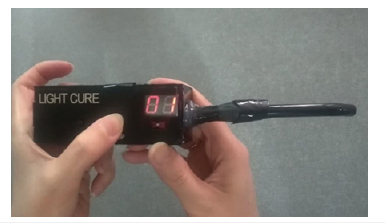
The Table 1 and Figure 11 demonstrate the complete specifications of the manufactured light cure device.
Table 1:The complete specifications of the device.
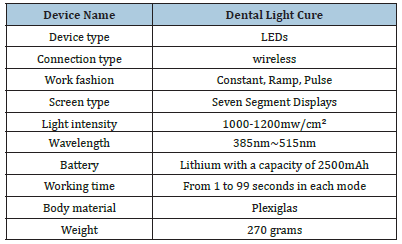
Figure 11:The real view of fabricated light cure.
Conclusion
Considering the widespread use of the Light Cure device in the field of dentistry and its increasing need, as well as the lack of a domestic brand that produces this device, as well as the cost-effectiveness of domestic production and preventing foreign exchange from leaving the country, the importance of manufacturing and designing this product at the present time is more it is visible. In the design and construction of this device, it has been tried to use a simpler user interface compared to similar examples, for example, the light irradiation time can be adjusted from one to 99 seconds, and it is optimized in three different working modes for all types of composites, a battery with High capacity and excellent quality for using the device in a portable manner, and the on/off switch that is not used in most reputable brands is used. Also, by using a quality probe and mold, the ease of use of this product is doubled.
References
- https://unicorndenmart.com/biocompatible-materials-in-restorative-dentistry-innovations-and-applications
- Taheri-Kafrani A, Shirzadfar H, Tavassoli-Kafrani E (2017) Dendrimers and dendrimers-grafted superparamagnetic iron oxide nanoparticles: Synthesis, characterization, functionalization and biological applications in drug delivery systems. Nano-and Microscale Drug Delivery Systems pp. 75-94.
- Shirzadfar H (2016) Rapid methods for the detection of bacteria via giant magnetoresistance sensor and biomagnetic marker. J Bioanal Biomed 8: e141.
- Shirzadfar H, Nadi M, Kourtiche D, Yamada S, Hauet T (2015) Needle-type GMR sensor to estimate the magnetic properties of diluted ferrofluid for biomedicine application. IRBM 36(3): 178-184.
- Shirzadfar H, Khanahmadi M (2018) Application of biomarkers and biosensors to detect and track pathogenic agents. International Journal of Analytical Techniques 4(1): 1-5.
- Shirzadfar H, Nadi M, Kourtiche D, Yamada S (2013) Characterization of a needle-type probe GMR sensor for biomedical applications. Sensors, pp. 1-4.
- Shirzadfar H, Khanahmadi M (2018) General review on the properties and applications of magnetic nanoparticles in biomedicine. Journal of Cardiovascular Medicine and Therapeutics 2(2): 1-8.
- Shirzadfar H (2014) Design and production of a GMR biosensor for the characterization of biological environments (Doctoral dissertation, University of Lorraine).
- Sharma S, Srivastava D, Grover S, Sharma V (2014) Biomaterials in tooth tissue engineering: A review. Journal of Clinical and Diagnostic Research: JCDR 8(1): 309-315.
- Hamdy TM (2023) Dental biomaterial scaffolds in tooth tissue engineering: A review. Current Oral Health Reports 10(1): 14-21.
- Ogueri KS, Jafari T, Ivirico JL, Laurencin CT (2019) Polymeric biomaterials for scaffold-based bone regenerative engineering. Regenerative Engineering and Translational Medicine 5(2): 128-154.
- Soundarya SP, Menon AH, Chandran SV, Selvamurugan N (2018) Bone tissue engineering: Scaffold preparation using chitosan and other biomaterials with different design and fabrication techniques. International Journal of Biological Macromolecules 119: 1228-1239.
- Lim JY, Lin Q, Xue K, Loh XJ (2019) Recent advances in supramolecular hydrogels for biomedical applications. Materials Today Advances 3: 100021.
© 2024 Hamidreza Shirzadfar, This is an open access article distributed under the terms of the Creative Commons Attribution License , which permits unrestricted use, distribution, and build upon your work non-commercially.
 a Creative Commons Attribution 4.0 International License. Based on a work at www.crimsonpublishers.com.
Best viewed in


.jpg)





 Editorial Board Registrations
 Submit your Article
 Refer a Friend
 Advertise With Us
.jpg)



.jpg)


.bmp)
.jpg)
.png)
.jpg)


.jpg)


.png)

.png)


.png)


