- Submissions

Full Text
Research & Development in Material Science
Mechanical Characterization of Graphene/Graphite Added 7075 Composites after Sintering and Thermomechanical Treatments
Ali Kalkanl1*, Olgun Tanberk2, Meltem Kocavaiz2 and İvgen Özdal2
1Metalurgical and Materials Engineering Department METU, Ankara, Türkiye
2Sinter Metal Technologies A.Ş İstanbul, Türkiye
*Corresponding author:Kalkanlı A, Metalurgical and Materials Engineering Department METU, Ankara, Türkiye
Submission: May 26, 2022;Published: June 09, 2022
ISSN: 2576-8840 Volume 17 Issue 1
Abstract
The aim of this work is to develop 7075 based grafen/graphite added metal matrix compostite for different applications. A series of aluminum based P/M MMC’s alloys were prepared with grafen and graphite addition to 7075 based P/M alloys were mixed with %1 grafen powder and pressed and sintered at vacuum condition. After sintering hot swaging were caried out heating specimens at 350 ℃ in a resistance furnace. The tensile strength values of the consolidated bars after T6 heat treatment is in the range of 345-431MPa inspite of local agglomerations in the alloy matrix. Wear depth measured at 10N load for graphene added composites revealed 150μm wear which is less than graphite added composites have 250μm measured value.
The aim of this reseach is to develop graphene/graphite added AA7075 alloy matrix composite material for different applications such as piston ring bearing to improve solid lubrication. A series of 7075 composite powder alloys were prepared with 1% graphene were mixed, cold pressed and sintered under vacuum condition. After sintering hot swaging experiments were performed preheated at 350 °C in a rezistance furnace deforming flat cross sections into round bars. T6 heat treatment were applied to hot swaged speciments. Altough the composite microstructures consist of local agglomerations in the matrix. Tensile strength values measured at room temperature are in the range of 345-431MPa.
Among the same group specimens tested at 10N load wear depth measured for graphene added composites is 150μm but graphite added composites’ wear depth measured is 250μm. In other words graphene added ones revealed less wear compare to graphite added 7075 matrix composites.
Keywords: Powder aluminum alloy; Graphene; Graphite; Hot forging; Swaging; Vacuum sintering
Introduction
There is need for development of wear resistant pistons with modified ring and crown sections against high temperature fatique and creep during service period of internal combustion engines.
By adding graphite/graphene solid lubricant materials into 7075 aluminum powder composite placed near to ring section and local reinforcement of crown front by SiC particles as a strategy of insertion functionally graded materials to improve high temperature fatique resistance and SiC particles in the matrix to prevent crack propogation in crown sections expose to combustion chamber of the pistons.The functionally graded insertions can be created and produced by sintering.
Sintered aluminum matrix composites are planned to be placed in two diffent sections of the piston cavity then pressure infiltration casting is to be applied to the permanent mould to integrade and finish processing. Racing car and manless aircraft engines requires ceramic particle reinforced sections and pistons having prolonged service life due to higher fatique and wear resistance with higher combustion temperatures and better fuel efficiency.
The need for higher efficiency and high compression pressure in the internal combustion engine still required in hybrid solutions for electric powertrains. Better combustion efficiency and performance is starting point of reseach on the development of pistons with functionally graded composite inserts. Aluminum matrix composite rings are under development stage to replace iron based rings with aluminum based ones which are more expensive, limited and lighter than traditional solutions.
One of the main goal of this work is develop an economical technique for 7075 graphene/graphite added composite material for insert of ring bearing sections by sintering processing and characterization. Graphite and graphene based materials used in pistons are planned for weight saving and solid lubrication to decrease friction coefficient. Powder handling stage of the work start with mixing of pure Al, Zn, Mg and Cu powders then sintering under vacuum condition. Alloy was prepared by melting and alloying in induction furnace.
When liquid phase and alloying exist two major phases α-Al and
MgZn2 are equilibrium phases yields a eutectic at room temperature.
The other possible phases forming during solidification are
S-Al2CuMg, T-Al2Mg3Zn3, and Al2Cu phases(Al-Zn-Mg-Cu) [1,2]
The ratio of Zn to Mg ratio is effective in MgZn2 intermetallic
formation. High zinc to magnesium ratio result in the formation
of other phases than MgZn2. These phases in nano and micro size
form in the alloy matrix after T6 heat treatment. They reinforces
the alloy matrix.
Materıals and Methods
In this work to make 7075 composites Al, Zn, Mg and Cu
element powders were mixed and sintered. Graphene powders
were produced by Sintermetal company using cryomilling
technique for more than 48 hours. The carbon base samples were
tested by a Raman Spectrometer to identify cahacteristic peaks
at METU Restoration laboratory in Faculty of Arcitecture. After
identification of the graphene powders they were mixed with Al,
Zn, Mg, Cu and powders. Sintered preforms were prepared using Al,
Mg, Zn and Cu element powders mixing, compacting and sintering
under controlled atmosphere furnaces in Sintermetal company’s
industrial process facilities. The four different group of powder
preforms are given as:
1. Sintered 7075 plain mixture
2. Sintered 7075+%1 graphite added
3. Sintered 7075+%1graphene added 48hrs milled
4. Sintered 7075+%1 graphene added (China)
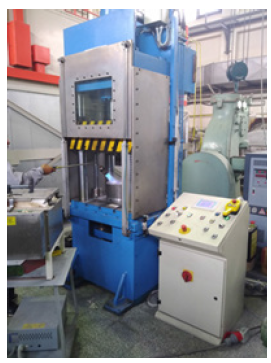
After cutting the sintered rectangular shapes into square cross section bars(50x10x100mm) they were hot forged under 100 Tons hydraulic press at METU Metal Processing Laboratory.
Second group specimens were hot swaged using FENN swaging machine at METU workshop (Figure 1).
Figure 1: Automated 100 Ton hydraulic press used for hot forging experiments at METU.
Hot forging experiments of 7075 sintered specimens
1. First group specimens initially solutionized at 485 ℃ for 3 hrs,
water quenched and aged at 120 ℃ for 12 hrs then preheated
to 250 ℃ for hot forging.
2. Second group specimens initially solutionized at 485 ℃ for 3
hrs, cooling to 350 ℃ then hot forged. Finally aged for 12hrs.
The tensile test specimens of the first two group specimens in were machined from flat rectangular shapes of hot forged slab blanks. Four groups of sintered specimens in thin slab shape were solutionized and water quenched, machined into standard tensile test geometry at T0 condition then heat treated for T6 condition by ageing at 120 ℃ for 12hrs. Tensile tests were performed at room temperature..Thermomechanical process were applied to all 7075 sintered specimens. First two group series processed by hot forging and second two groups sintered specimens were processed by hot swaging. Hot forged specimens are machined in flat form but hot swaged specimens were machined into round cross section.
First group T6 heat treated and hot forged specimes were machined into flat shape and tested by Instron tensile test unit at METU mechanical testing laboratory (Figure 2).
Figure 2: Schematic diagram of the bending strength, L: load, S: spam, T: thickness, W: width.

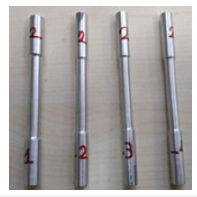
3. Hot swaging experiments were carried out at METU Metallurgical and Materials Engineering Department’s work shop by preheating at 350 ℃ in a resistance furnace then swaging in FENN machine reducing the cross section from 12mm into 8mm diameter round bar shape. T6 heat treatment was applied to the rods obtained (Figure 3).
Figure 3: Machined round tensile test bar specimens form hot swaging operation and heat treated for T6 condition. The tensile test results are given in Table 1.
Results and Discussion
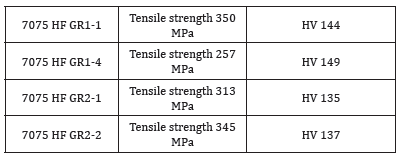
This table shows thermomechanically processed sintered and hot forced 7075 alloys having highest strength and hardness values (Table 1).
Table 1: Tensile strength and microhardness after sintering and hot forging of two higest values form each group.
After sintering and hot swaging experiments highest values selected from four groups are given in Table 2.
Table 2: Tensile strength and microhardness of sintered and hot swaged samples.
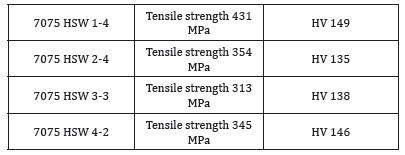
The tensile strength values of hot swaged specimens are higher than hot forged specimens. Tensile strength value of the specimen 1-4 is 431MPa and there is no flake like agglomerations in the matrix and graphene distribution is more homogeneous. As a common observation when microhardness measured to be high corresponding tensile strength values are also high (Figure 4).
Figure 4:Highest tensile strength values of hot swaged samples after T6 heat treatment.
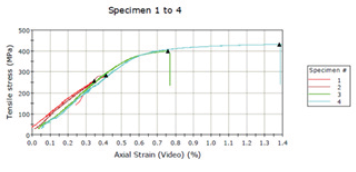
The specimens labeled as 2-4, 3-3 and 4-2 tensile strength values are in range of 350-431MPa but percent elngation is not more than 1.4. This is due to un even distribution of graphene/ graphite in the matrix, microporosity and unreduced oxides along grain boundaries (Figures 5-7).
Figure 5:Hot swaged 7075 HSW 1-4 SEM image and point analysis A(Al,Fe,Cu,Si,Zn), B(Al,Zn,Cu,Mg) C(Al,Zn,Cu,Cr,Mg). Tensile strength: 431 MPa.
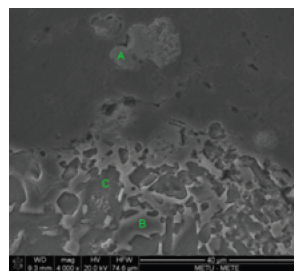
Figure 6: The optical micrograph of hot swaged specimen after T6 heat treatment. HSW 1-4 Huvitz optical 3D microscope image. Tensile strength: 431MPa. Black regions are graphite/graphene rich zones.
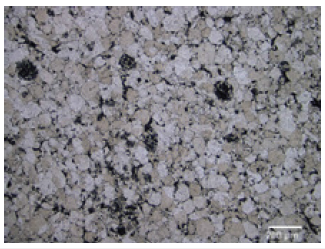
Figure 7: Hot swaged 7075 HSW 3-3 SEM image A(Al,Zn,Cu,Mg), B(C, Al, Si ) Tensile strength: 313MPa.
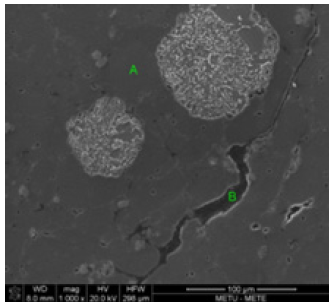
The appearence of carbon rich region marked as B which is flake shape. This result reveal the mixing difficulty of graphene powders into 7075 aluminum powders due to surface tension and surface activity of ultrafine powders. There is tendency of segregation of graphene powders during mixing stage. To overcome this difficulty mixing period was extended to 45 mins. The point A stands for matrix and Zn, Mg and Cu peaks reveal the effective homogenization of premixed powders at sintering stage.
The precipitate phase reflections of AlMgZn, AlMg2Zn and MgZn2 were reported beside Al peaks in sintered samples given in the literatüre. Mg2Zn11 phase was also reported in the thermomechanically processed 7075 alloys [3-5].
Wear testing of the samples
After sintering and four group 7075 alloy samples in rectangular shape were tested applying 10 and 20N loads by UTS Tribometer T10/20 in Iron and Steel Institute of Karabük Universtiy (Figure 8). The wear depths of sintered 7075 specimens prepared at Sintermetal facilities and tested at Iron and Steel Institute Karabük University are given below (Figures 9-12); Table 3.
Figure 8: Wear test device used for testing of specimens in Iron and Steel Institute Karabük University.
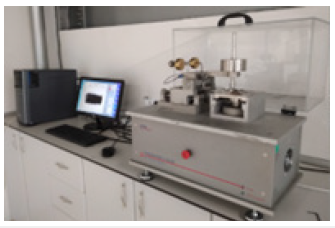
Figure 9: Plain 7075 sintered specimens tested under 10N and 20N with steel ball movement on the surface of aluminum samples with back and forward action.
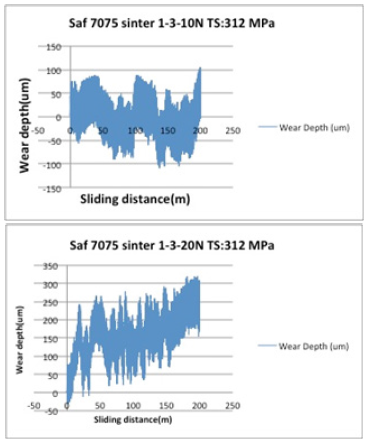
Figure 10: 7075+Grafit(%1) sintered composites tested under 10N and 20N load wear testing with back and forward moving action.
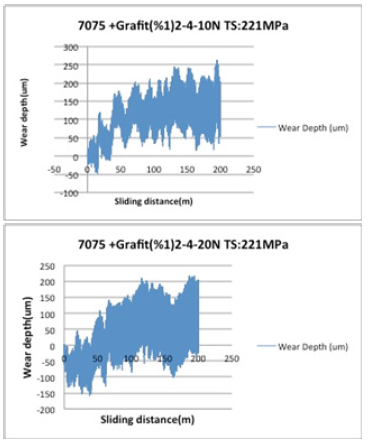
Figure 11: Plain 7075+Graphene 48hrs(%1) sintered composites tested under 10N and 20N load wear testing with back and forward moving action.
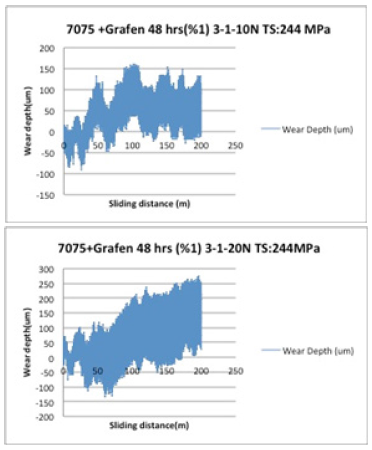
Figure 12: 7075+Grafen China(%1) sintered composites tested under 10N and 20N load wear testing with back and forward moving action.
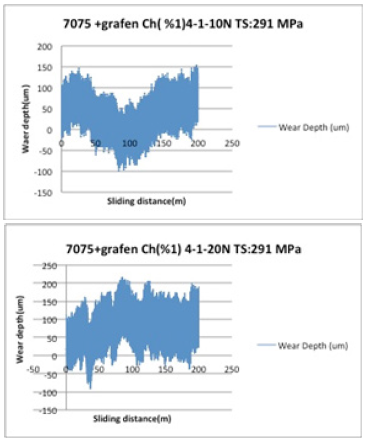
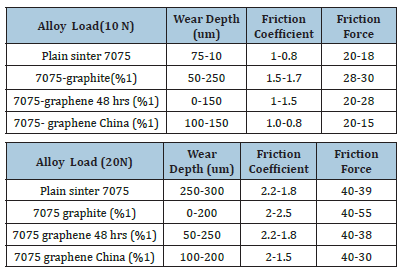
Table 3: The results of wear testing of four 7075 group sintered and thermomechanically processed powder alloys.
The tensile strenght and microhardness values increases with a positive trend after hot forging and swaging operations. The reason of this trend is formation of nano size MgZn2 precipitates after T6 heat treatment which can not be identified by SEM analysis. After sintering, thermomechanic processing and T6 heat treatment hot swaged samples posses higher tensile strength values than hot forced ones.
Tensile strength values of hot forging after sintering and T6 heat treated samples is 350MPa on contrary the tensile strength of hot sawing and T6 heat treated samples is measured as 431MPa. The possible intermetallic phases reported in the literature are Al2CuMg, T-Al2Mg3Zn3, and Al2Cu phases (Al-Zn-Mg-Cu) [1,2]. According to the SEM examinations performed on the specimens produced in this work revealed MgZn2 beside copper containing Al2CuMg phase. Since these phases exist together point element analysis performed by EDX analysis shows Al, Zn, Mg and Cu peaks in the same spectrum.
Wear depth measured for first group of plain 7075 sintered samples tested under 10N load is increasing form 75-10μm to 250-300μm range Wear depth measured under 10N load graphite added group wear depth is 250μm and graphene added group is 150μm. As a summary graphene added composites shows less wear than graphite added composites. The same trend was observed in friction coefficient measurements given in Table 3. Friction coefficient determined under 10N load for graphene added group is in the range of 0.8-1.5 and graphite added group is in the range of 1.5-1.7 which is higher than graphene added composites.
In the second serie friction tests measured for plain sintered 7075 under 20N shows highest wear dept increasing from 75-10μm to 250-300μm range. Graphite added group show an increasing trend from 50-250μm range to 0-200μm range. Graphene (48hrs) group showed an increase from 150 to 250μm and graphene(china) revealed an increase from 150 to 200μm under same loading condition. Friction coefficient of plain 7075 alloy under 20N load is drastically increases in range from 1-0.8 to 2.2-1.8. but graphite added group increases from 1.7 to 2.5, graphene 48hrs group increases from 1.5 to 2.2 and graphene(china) added group increases from 1.0 to 1.5-2.
Acknowledgement
This work was sponsored by TEYDEB. Authors would like to thank TUBİTAK for supporting Sintermetal Company’s research project on ‘Development of 7075 sintered MMC’s with graphene and graphite addition’.
References
- Seong TL, II Sang E, Soo WN (2003) Mat Tran 44(1): 181.
- Mukhopadhyay AK (2009) Trans Ind Ins Metal 62: 113.
- Chaiyoot M, Yongyuth D, Dech M, Suppachai C (2018) Transient liquid phase bonding of semi-solid metal 7075 aluminum alloy using ZA27 zinc alloy ınterlayer. Metals 8(8): 637.
- Jabbari T, Ruiz NEM, Torralba JM (2014) Microstructural and mechanical characterisation of 7075 aluminium alloy consolidated from a premixed powder by cold compaction and hot extrusion. Materials & Design 55: 674-682.
- Mohsen H, Mostafa A, Seyed AJJ (2016) Microstructure modification of powder compact of Al–Zn–Mg nanostructured alloy by a semisolid thermomechanical processing. Acta Metall Sin (Engl Lett) 29(1): 39-45.
© 2022 Ali Kalkanl. This is an open access article distributed under the terms of the Creative Commons Attribution License , which permits unrestricted use, distribution, and build upon your work non-commercially.
 a Creative Commons Attribution 4.0 International License. Based on a work at www.crimsonpublishers.com.
Best viewed in


.jpg)


 Editorial Board Registrations
 Submit your Article
 Refer a Friend
 Advertise With Us
.jpg)




.jpg)


.bmp)
.jpg)
.png)
.jpg)


.jpg)


.png)

.png)


.png)


