- Submissions

Full Text
Research & Development in Material Science
Metallic Coatings of Steels by Friction Surfacing Process
Mohamed Fouad Ouamene and Zakaria Boumerzoug*
LMSM, Department of Mechanical Engineering, University of Biskra, Biskra, Algeria
*Corresponding author: Zakaria Boumerzoug, Mechanical Engineering Department, LMSM, University of Biskra, Algeria
Submission: December 13, 2021;Published: December 20, 2021
ISSN: 2576-8840 Volume 16 Issue 2
Abstract
The objective of this study is to investigate the coating of steels by using friction surfacing process. Two different steels were used in this study (A60 and XC steel). Optical microscopy and hardness measurements were used as techniques of characterization. The coating process was succeffully performed in milling machine. The obtained results indicated the difference between the substrate and the deposited material from the microsructural or mechanical properties. The hardness of the coating is higher than the substrate.
Keywords: Friction surfacing; Steels; Substrate; Coating
Abbreviations: FS: Friction Surfacing
Introduction
Figure 1: Schematic representation of the friction surfacing process.
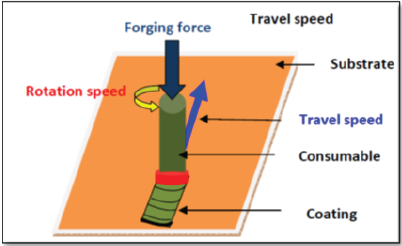
Surface engineering is the sub-discipline of material science. Surface coatings are often used in engineering components for wear and corrosion protection. Friction Surfacing (FS) is an emerging surface engineering technology, derived from conventional friction welding, which was invented and patented in 1941 by Klopstock and Neeleands [1,2]. In modern days, friction surfacing has revived interest, consumed by the need for superior overcoat solutions. FS is a solid state process used for the production of metallic coatings. A rotating consumable rod is fed against a substrate under an axial load applied by rotational friction (Figure 1). The friction generates heat which generates a viscoplastic boundary layer at the end of the consumable rod, which travels along the surface of the base metal. The pressure and heat conditions initiate an interdiffusion process, forming a metallic bond between the deposited material and the substrate. As the consumable rod material undergoes a thermomechanical process, a fine-grained microstructure is produced by dynamic recrystallization [3]. Due to the highly plasticized material of the lower end of consumable rod is pressed without restraint, resulting in the material flows out of consumable rod, so a flash is generated at the tip of consumable [4].
The main advantage of the FS process is the coating is free from any defects such as holes, pores and inclusions common in welding processes by fusion [2]. Coatings are evaluated mainly based on thickness, width and bond strength which are closely related to process parameters [5]. The main parameters of the FS process of friction deposit are diameter of the consumable pin, advance speed, axial force applied, speed of rotation of the consumable pin, and tilting angle.
According to the literature, some metals were coated by using FS. For example, a friction surfacing of AA5083 on a DH36 steel substrate was experimentally studied by Hongjun et al. [6]. The authors concluded that from this investigation, they found that the increase in feed rate led to higher deposition bonding strength and lower deposition roughness. Increasing the travel speed reduced the deposition thickness and bonding strength but increased surface quality. With the increase of rotation speed, the deposition width and surface quality decreased, while the bonding strength increased. With the chosen process parameters, a good deposition interface was created. Elemental diffusion of Fe to the AA5083 side of the interface was detected.
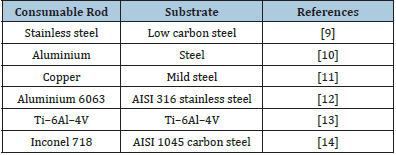
Table 1 presents the some selected deposited materials by FS process. The number of coated material by the FS process is very limited. It can be concluded that FS of different metal substrates with different coating combinations, comprising of hard coatings on soft substrates and soft coatings on hard substrates [7,8].
Table 1: Some selected deposited material by FS process.
However, the published woks about coating of low carebon steel with low carbon steel were not reported in the literature. The objective of this work is to present the investigation of the coating of A60 steel by X48 steel and vice-versa. In addition, the coating of A60 steel with the same A60 steel was also carried out. Hardness measurements and optical observations were the main techniques of characterization.
Experimental Procedure
Base materials
For the friction surfacing, tools and substrate were prepared as indicated in Table 2.
Table 2: Friction surfacing tools and substrate.

The chemical composition of the two steels is presented in Table 3 & 4.
Table 3: Chemical composition of A60 steel.

Table 4: Chemical composition of XC48( Wt.%)

riction surfacing technique
Friction surfacing process was carried out on a universal milling machine PMO (Figure 2). A rotating consumable rod is fed against a substrate under an applied axial load rotary friction (Figure 3). Table 5 presents the main process parameters.
Figure 2: Universal milling machine PMO.

Figure 3: Coating of steel by a friction surfacing process.
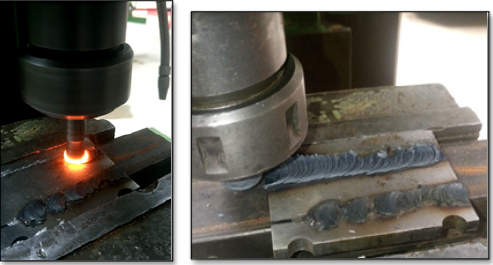
Table 5: Parameters of the friction surfacing process.

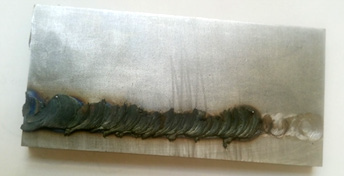
Figure 4 shows a typical coating by friction surfacing process of A60 steel on X48 steel . the circularity patterns are visible on the plate by the rotation of the rod which has been consumed.
Figure 4: Coating of steel by a friction surfacing process.
Characterization techniques
For microstructural observations, chemical etching was applied on the polished sample by using a solution of 2% Nital during 40 seconds. The optical observations were conducted by using an opticope microscope with different magnifications. The type of the optical microscope is Olympus. Hardness measurements were performed by using Hardness Vickers tester ( Type : ZWICK) with load of 300g. Hardness profile was performed from the deposit steel to the substrate steel.
Results and Discussion
Microstructures of the base materials
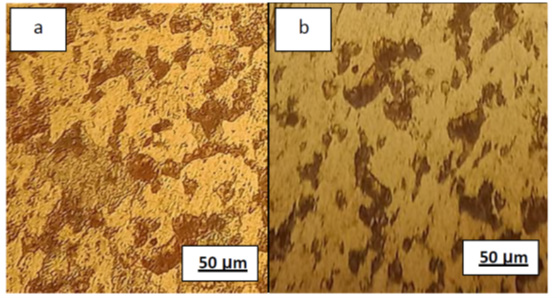
In this study, two different steels are used, A60 and XC48 steels. Figure 5a presents the microstructure of A60 steel and Figure 5b presents the microstructure of XC48 steel. The microstructure of these steels is formed mainly with Ferrite as matrix and pearlite.
Figure 5: Microstructure of : (a) A60 steel and (b): X48 steel.
Application of friction surfacing of A60 steel over a XC48 steel
Figure 6 presents the macrographic view of the result of the application of friction surfacing of A60 steel over a X48 steel. As it is shown, a good metallurgical bonding between the substrate and the deposit steel. The width of the deposit is approximatively equal to 1.5mm.
Figure 6: Deposition morphology of A60 steel over a XC48 steel.
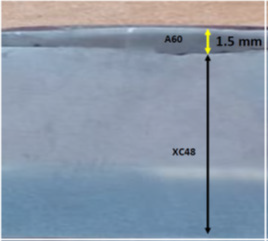
Figure 7 presents microstructure observation by optical microscopy of cross section the coated sample by friction surfacing. The deposited layer is characterized by a refined microstructure due to the recrystallization process during the friction surfacing. Rafi et al. [15] observed fine equiaxed grains in stainless steel deposit on mild steel substrate of recrystallisation. There was an interconection between grains of the substrate and the deposit steel.
Figure 7: Microstructures of A60 steel over a X48 steel.
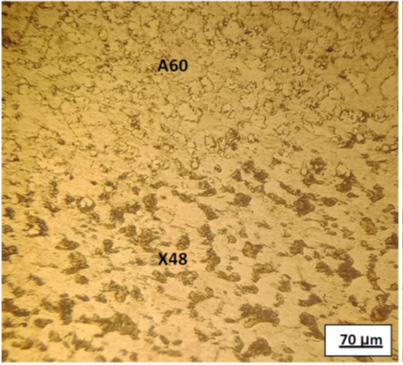
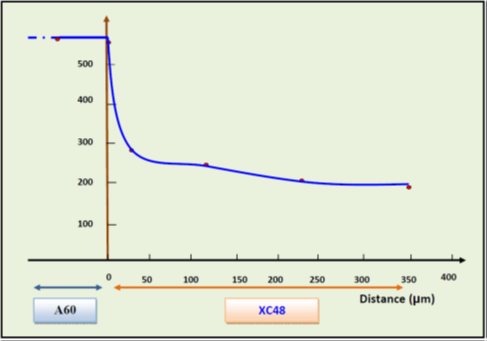
Figure 8 presents the hardness curves from the coating to the core of the substrate. As it is observed, the hardness varies from the coating to the core of the substrate. The high hardness is measured on the deposit steel because it has finer grains. However, the lowest hardness value was measured on the core of the substrate. However, the interface has medium hardness vaulue.
Figure 8: Microhardness profile of A60 steel over a X48 steel.
Application of friction surfacing of X48 steel over a A60 steel
Figure 9 presents the macrographic views of the result of the application of friction surfacing of X48 steel over a A60 steel. As it shown, a good bonding has been accomplished between the substrate and the deposit steel, because there are not defects in the interface X48/A60 such as cracks or pores.
Figure 9: Deposition morphology of X48 steel coating over a A60 steel.
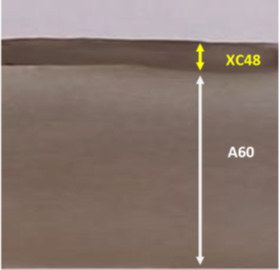
Figure 10 presents microstructure observation by optical microscopy of cross section of the coated sample by friction surfacing. The microstructure of the coating (X48) is different from the substrate (A60).
Figure 10: Microstructures of X48 steel coating over a A60 steel.
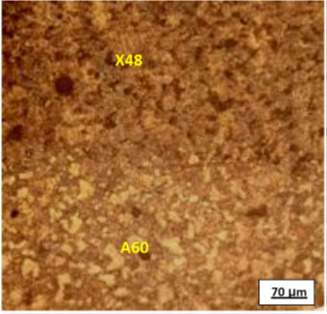
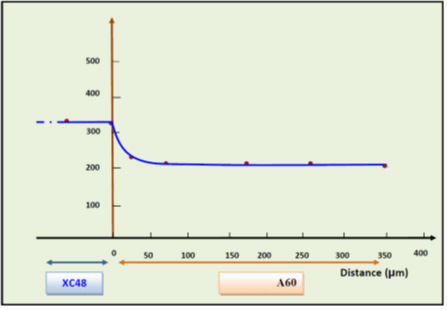
Figure 11 presents the hardness curves from the coating to the core of the substrate. As it is observed, the hardness varies from the coating to the core of the substrate. The high hardness is also measured on the substrate and the lowest hardness value was measured in the core of the substrate.
Figure 11: Microhardness profile of XC48 steel coating over a A60steel.
Application of friction surfacing of A60 steel coating over a A60 steel.
Figure 12 presents the macrographic views of the result of the application of friction surfacing of A60 steel coating over a A60 steel. As it shown the A60 was well deposited, because there was not observed pores or cracks in the interface ( Coating/substrate).
Figure 12: Deposition morphology of A60 steel coating over a A60 steel.
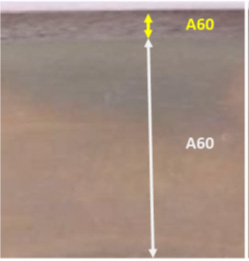
Figure 13 presents microstructure observation by optical microscopy of cross section the coated sample by friction surfacing. The microstructure of the deposited steel is composed with finer grains than the substrate. fine grained microstructure is generated by dynamic recrystallization. It has been reported that the friction surfacing is a solid-state coating process that uses plastic deformation to improve the efficiency of the core metallic pattern, resulting in fine-grained coatings with superior wear and corrosion properties [16].
Figure 13: Microstructure of A60 steel coating over a A60 steel.
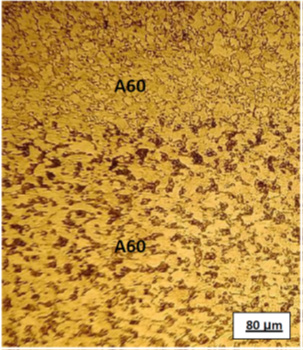
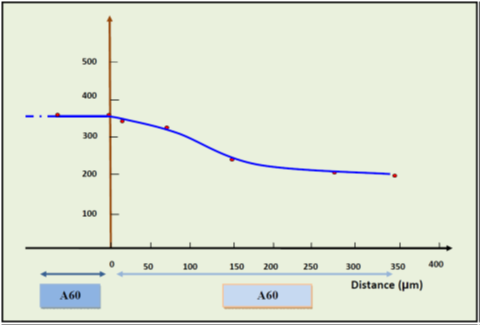
Figure 14 presents the hardness curves from the coating to the core of the substrate. As it is observed, the same shape of curve is also obtained in this kind of deposition by FS. The hardness varies from the coating to the core of the substrate. The high hardness is measured on the deposit and the lowest hardness value was measured in the core of the substrate.
Figure 14: Microhardness profile of A60 steel coating over a A60 steel.
Conclusion
Based on the results, the following conclusions were obtained: 1. The surfacing coating were successfully performed by coating XC48 steel with A60 steel, and coating A608 steel with XC48 steel. In addition to that, A60 was also coated by A60 steel and XC48 was coated by XC48 steel.
2. The optical microscopy was shown that the welding between substrate and deposit was successfully performed.
3. The optical observations have revealed that the grain size of the substrate close to the interface (substrate/deposit ) are smaller than the grain size in the core of the substrate.
4. The hardness measurements revealed the high hardness value in the deposit than the substrate. This is a one of the positive properties of friction surfacing.
References
- Batchelor A, Jana S, Koh CP, Tan CS (1996) The effect of metal type and multi layering on friction surfacing. J Mater Process Technol 57(1-2): 172-181.
- Bedford GM (1990) Friction surfacing for wear applications. Metals Mater 6(11): 702-705.
- Vilaca P (2014) Surface modification by solid state processing. pp: 25-72.
- Li M (2015) Development and prospect of friction surfacing technology. Proceeding of the International Symposium on Knowledge Acquisition and Modeling, London.
- Welding brazing and soldering. In: Olson D, Siewert T, Liu S, Edwards G (Eds.), ASM Handbook, ASM International, Ohio, USA, pp: 321-323.
- Hongjun L, Wei Q, Galloway A, Toumpis A (2019) Friction surfacing of aluminium alloy 5083 on DH36 steel plate. Metals 9(4): 479.
- Hidekazu S, Hiroshi T (2003) Mechanical properties of friction surfaced 5052 aluminum alloy, J Jpn Inst light Met 44(12): 2688-2694.
- Takeshi S, Sinya O, Takemoto S, Kato Y, Shimizu T (1996) Deposition of hard Coating layer by friction surfacing. JJ Jpn Weld Soc 10(4): 288-294.
- Labesh Kumar C (2017) Friction surfacing of stainless steel on low carbon steel for corrosion resistance application- an experimental approach. International Journal of Mechanical and Production Engineering Research and Development 7(5): 123-144.
- Badheka K, Badheka V (2017) Friction surfacing of aluminium on steel: An experimental approach. Materials Today: Proceedings 4(9): 9937-9941.
- Jujare T, Kumar A, Kailas SV, Bhat BU (2014) Friction surfacing of mild steel by copper: A Feasibility study. Procedia Materials Science 5: 1300-1307.
- Sahoo DK, Mohanty BS, Amal Pradeep MV, David Feby John A (2021) An experimental study on friction surfaced coating of Aluminium 6063 over AISI 316 stainless steel substrate. Materials Today: Proceedings 40: S10-S18.
- Fitseva V, Krohn H, Hanke S, dos Santos JF, (2015) Friction surfacing of Ti-6Al-4V: Process characteristics and deposition behaviour at various rotational speeds. Surface and Coatings Technology 278: 56-63.
- Sahoo D, Bharath KR, Syed Saqlain Z (2020) Influence of process parameters during the friction surfaced deposition of inconel 718 over AISI 1045 carbon steel substrate. AIP Conference Proceedings 2311(1).
- Khalid Rafi H, Janaki Ram GD, Phanikumar G, Prasad Rao K (2010) Microstructure and properties of friction surfaced stainless steel and tool steel coatings. Materials Science Forum 638-642: 864-869.
- Rethnam GSN, Manivel S, Sharma VK, Srinivas C, Afzal A, et al. (2021) Parameter study on friction surfacing of AISI316Ti stainless steel over EN8 carbon steel and its effect on coating dimensions and bond strength. Materials 14(17): 4967.
© 2021 Zakaria Boumerzoug. This is an open access article distributed under the terms of the Creative Commons Attribution License , which permits unrestricted use, distribution, and build upon your work non-commercially.
 a Creative Commons Attribution 4.0 International License. Based on a work at www.crimsonpublishers.com.
Best viewed in


.jpg)


 Editorial Board Registrations
 Submit your Article
 Refer a Friend
 Advertise With Us
.jpg)




.jpg)


.bmp)
.jpg)
.png)
.jpg)


.jpg)


.png)

.png)


.png)


