- Submissions

Full Text
Modern Research in Dentistry
Retreatment in Endodontics: A Case Report
Viresh Chopra*
Senior Lecturer in Oman Dental College, Muscat, Oman
Course leader, Endodontology, Oman dental College, Muscat
Private practice limited to microscopic Endodontics
*Corresponding author: Viresh Chopra, Senior Lecturer in Oman Dental College, Muscat, Oman
Submission: June 10, 2020;Published: November 13, 2020

ISSN:2637-7764Volume5 Issue4
Introduction of the Case
Case of failed root canal treatment associated with a previous inadequate root canal treatment and faulty post placement. The patient reported with symptomatic apical periodontitis.
Patient information
- Age:28-year old
- Gender: Male
- Medical history: non-contributory
Tooth
- Identification: Right mandibular first molar (Tooth 46).
- Dental history: Chief complaint: I am having pain when I eat or put pressure on my tooth. History of previously attempted root canal treatment done on right mandibular first molar. Root canal was done 2 years back.
- Clinical examination findings: The tooth 46 is tender to percussion and had a resin composite restoration and occlusally the metallic post was visible.
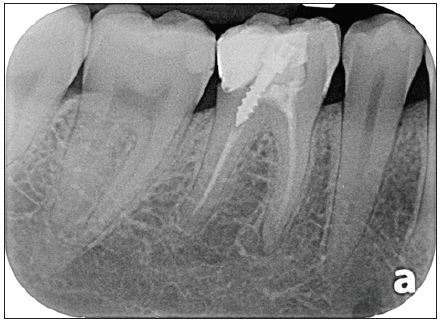
- Preoperative radiological assessment: The periapical radiograph revealed previous root canal treatment in 46. The tooth 46 and had a metallic screw/threaded post in distal canal (Figure 1).
- Diagnosis (pulpal and periapical): Symptomatic apical periodontitis with inadequate root canal treatment.
Figure 1:Periapical radiograph inadequate root canal treatment in 46. Periapical radiolucency associated with the mesial roots can be seen. Metallic threaded post can be seen in the distal canal.
The patient was informed about the problem and advised retreatment in 46. Patient advised about post removal to be done, presence of cracks to be explored and retreatment to be done along with location of missed canals will be attempted.
Treatment plan
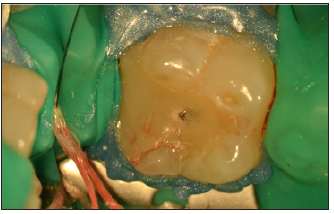
Procedures in the first visit: Buccal infiltration anesthesia was administered, and the tooth was isolated with rubber dam isolation. The retreatment was initiated under microscope. Occlusal surface showed resin composite restoration along with metallic post head (Figure 2).
Figure 2: Rubber dam isolation of tooth 46. Occlusal surface with resin composite and head of the metallic threaded post.
The first step was to remove resin composite restoration and expose the occlusal part of the metallic post. (Figure 3a&3b) Once the occlusal part of the post is exposed, Endodontic ultrasonic tips were used to unscrew/loosen the post and facilitate its removal from the canal (Figure 4). The post was loosened with the help of ultrasonic tips and removed from the canal (Figure 5a&5b).
Figure 3: Removal of resin composite restoration to expose the head and further the occlusal part of the metallic post.
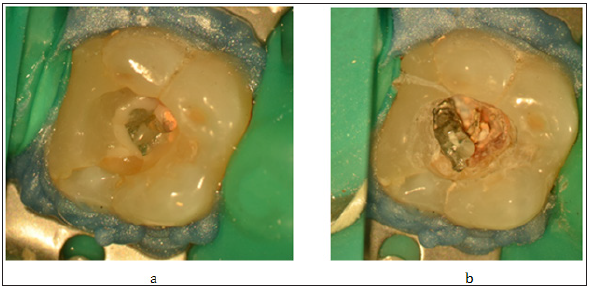
Figure 4: Post removal with the help of Endodontic ultrasonic tips.
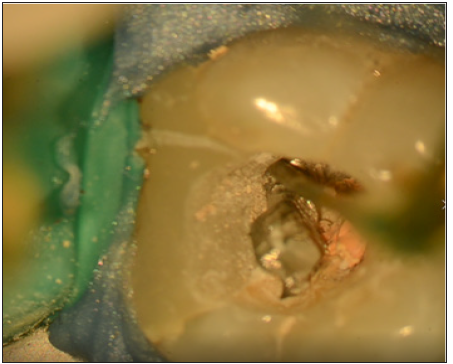
Figure 5: a. The distal canal after removal of the metallic post. b. Metallic post after removal.

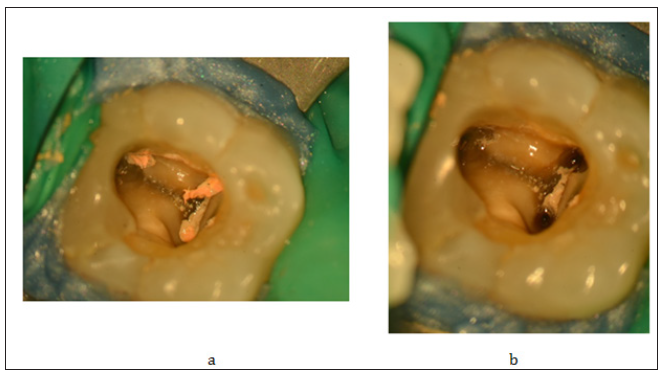
Treatment procedure for the second appointment: Removal of gutta percha from the pulp chamber and the canals was planned in the second appointment. Also, exploration of the access cavity was done for presence of any cracks or extra canals present. Removal of previous gutta percha from the canals was done by using Endoshaper file from FKG. The gutta percha was first softened with the use of gutta percha solvent and then endo shaper file was introduced at 2500rpm to facilitate the removal of gutta percha from the canal (Figure 6a&6b).
Figure 6: a. Gutta percha removed from the pulp chamber. b. Gutta percha removed from the canals.
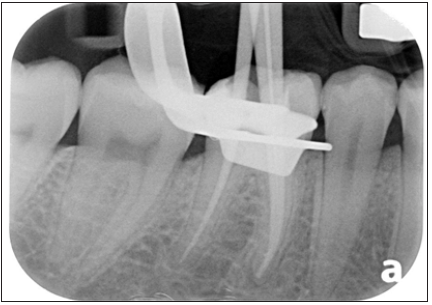
In addition to the removal of gutta perchas, final cleaning and shaping of the canal was planned in this visit. If the patient remained comfortable throughout the appointment and if time permits obturation was also planned in the same appointment. Once the removal of gutta perchas were done. Access cavity was explored for presence of cracks and extra canals. No extra canals were found. Endodontic hand files were used to determine working length along with electronic apex locator. The working length was verified with periapical radiograph (Figure 7). The canals were finally cleaned and shaped with Hyflex CM files up to size 25/04. EDTA gel, saline, 2.5% sodium hypochlorite and EDTA liquid were used as irrigants alternatively (Figure 8). Ultrasonic agitation of the irrigates was done with Endoultra from Dentsply. Clinically the fit of the master cones was checked and the verified with a peri apical radiograph at the calculated working length (Figure 9).
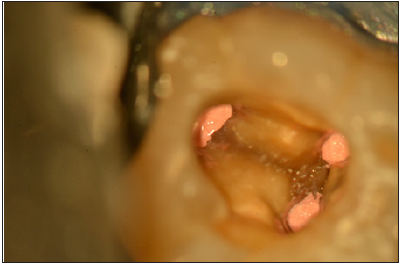
Total fill, a bioceramic sealer from FKG was used along with gutta-percha as the core obturating material. The premixed sealer was applied in the canals with the help of disposable dispending tips. The master cones were coated with the sealer and placed inside the canals. The gutta percha was cut at the orifice level with heated Plugger. All the canals were obturated and the pulp chamber cleaned of any gutta percha or sealer (Figure 10). Immediate postoperative radiograph was taken to verify the final obturation.
Figure 7: Periapical radiograph showing working length determination after gutta percha removal.
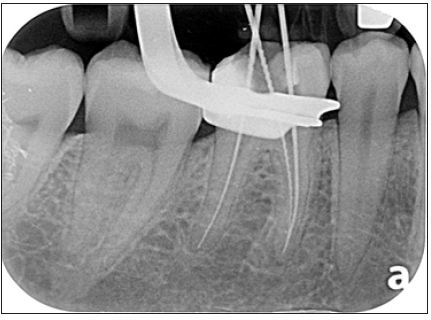
Figure 8: Clinical picture showing irrigant inside the canals and pulp chamber.

Figure 9: Periapical radiograph to verify the fit of the master cones at the correct working length.
Irrigation protocol
- Hand files were used with EDTA gel: rinsing with saline
- 5% sodium hypochlorite throughout the cleaning and shaping procedure. Rinse with saline.
- 17% EDTA 1ml/canal with sonic/ultrasonic activation. Rinse with saline.
- Final rinse with 2.5% sodium hypochlorite with internal heating with any instrument like e.g. touch n heat and sonic ultrasonic activation for 20-30 sec per canal.
Flushing with saline between irrigants is must, as it will stop the irrigants from reacting with each other.
Materials used for obturation
Figure 10: Immediate clinical picture showing obturation of all the canals up to the canal orifice.
Total fill bioceramic sealer from FKG, Hyflex CM rotary endodontic files from Coltene.
Technical Aspects
Figure 11: Immediate post-obturation periapical radiograph confirming the obturation of all the canals up to the calculated working length.
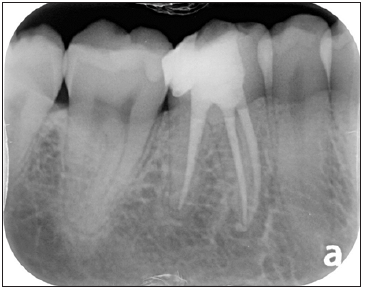
Proper cleaning and shaping of the root canals along with adequate disinfection is one of the important requirements for the success of the endodontic treatment. Failure to achieve adequate disinfection through irrigation will lead to left over microorganisms or pulpal debris leading to post-treatment infections (Figure 11).
Endodontic ultrasonic tips should be used to stay conservative while removing metallic posts or broken files from the root canals. Excessive removal of tooth structure might lead to fracture of the tooth due to low strength. If a post has to be placed inside the root canal, then it should be placed up to adequate length to be stable as the retention of the post inside the canal is directly proportional to the length of the post in the canal.
In this case, Hyflex CM rotary files were used from Coltene. The files were used with TCA technique. According to this technique:
- Rotary file should be introduced without any rotation until it feels resistance inside the canal.
- Feel the canal (Tactile sensation).
- Rotate the file for few seconds only and allow it to proceed only 1mm apically.
- Take out the file, irrigate the canal, clean the file, adjust stopper, reintroduce without rotating, and repeat.
- Repeat these steps until working length is achieved.
Copious irrigation should be maintained throughout the procedure and Endodontic files should not be used in dry canals.
Follow Up
Follow up radiograph could not be done as the patient never returned.
Learning Objectives
The reader should be able to
- Understand the importance to use endodontic ultrasonic for the removal of metallic posts from the root canals.
- Understand the need to negotiate the full length of the canal.
- Understand and appreciate the anatomy/shape of the root canal system
- Plan/Modify the treatment steps as per the anatomy/shape of the root canal.
- Understand the role of irrigants for disinfecting the root canal system.
- Understand the importance of using endodontic ultrasonic tips to locate hidden canal orifices.
- Understand the importance of incorporating the whole root canal system in the disinfection process during re-treatment.
- Clinically decide which instrument to be used for a particular step during an endodontic treatment or retreatment.
How can this endodontic mishap be avoided
Proper cleaning and shaping along with adequate use of irrigants for disinfection is necessary for the success of endodontic treatment. Failure to achieve the required disinfection might lead to post treatment disease therefore, causing failure of the Endodontic treatment.
© 2020 Viresh Chopra. This is an open access article distributed under the terms of the Creative Commons Attribution License , which permits unrestricted use, distribution, and build upon your work non-commercially.
 a Creative Commons Attribution 4.0 International License. Based on a work at www.crimsonpublishers.com.
Best viewed in


.jpg)


 Editorial Board Registrations
 Submit your Article
 Refer a Friend
 Advertise With Us
.jpg)



.jpg)


.bmp)
.jpg)
.png)
.jpg)


.jpg)


.png)

.png)


.png)


