- Submissions

Full Text
Evolutions in Mechanical Engineering
The Potential of IR Pyrometry for Monitoring Interpass Temperature in Wire + Arc Additive Manufacturing
Leandro João da Silva1,2, Ruham Pablo Reis1 and Américo Scotti1,3
1Federal University of Uberlândia (UFU), Laprosolda - Center for Research and Development of Welding Processes, Uberlândia, MG, Brazil
3SENAI Innovation Institute for Manufacturing Systems and Laser Processing, Joinville, SC, Brazil
3Högström Väst (University West), Department of Engineering Science, Production Technology West, Division of Welding Technology, Trollhättan, Sweden
*Corresponding author: Americo Scotti, Högström Väst (University West), Sweden, Email: americo.scotti@hv.se
Submission: July 30, 2019;Published: September 24, 2019

ISSN 2640-9690 Volume3 Issue1
Abstract
The present work aims at presenting and discussing IR pyrometry as applied to Wire+Arc Additive Manufacturing. The importance, different concepts and approaches for measuring interpass temperature are introduced and discussed. The advantages and setbacks of IR pyrometry in comparison with other techniques are presented. Based on experimental results and by using potential solutions for emissivity determination and mitigation of interferences from arc/pool radiations, it is shown that IR pyrometry can be considered as a feasible technique for non-contact interpass temperature measurement with high spatial resolution (small spot size), with promising potentials towards control implementation.
Keywords: Additive Manufacturing; Directed Energy Deposition; WAAM; Interpass temperature; Pyrometry
Introduction
Directed Energy Deposition (DED) category encompass Additive Manufacturing (AM) processes, in which focused thermal energy is applied to fuse materials by melting as they are being deposited [1]. Wire+Arc Additive Manufacturing (WAAM) is a DED approach which adopts electric arc as thermal energy source and metallic wire as feedstock. It is based on processes typically employed for welding yet adapted for AM purposes. Detailed reviews about WAAM can be found in the current literature, as per Rodrigues et al. [2], Cunningham et al. [3], Pan et al. [4], Williams et al. [5] and Ding et al. [6]. These reviews all culminate in the fact that the main advantages of WAAM are cost-saving and high-deposition-rate features. There are other advantages not widely mentioned, likely more tangible than the term “costsaving”, which turns to be imprecise if the whole design and production constraints are not correctly outlined.
Figure 1:Bibliometrics of interpass temperature related to WAAM.

Although there is mutual effort from academia, suppliers and top managers to bring WAAM to the industrial scenario, some challenges still need to be properly overcome before it is said that WAAM is an industrially ready technology. In this context, according to the ASTM F3187-16 standard guide [1], the interpass temperature may be a key variable for DED processes and materials. To outline the current importance of the topic, bibliometric data related to interpass temperature in WAAM was raised by the authors using the Scopus database and the following searching syntax terms: (“additive manufacturing” OR “3D printing” OR “rapid prototyping”) AND (WAAM OR “wire arc” OR “wire + arc” OR welding OR Plasma OR PAW OR GMAW OR “MIG/MAG” OR CMT OR GTAW OR TIG) AND Figure 1 “interpass temperature” OR “interlayer temperature”). The compiled results are displayed in . A significant increase in research interest for interpass temperature related to WAAM can be noticed in recent years, which reflects the key importance of this monitoring and control parameter for such modern manufacturing route. There seems to be no signs of decrease in scientific interest (the figures should be even higher by the end of 2019). This trend could be, according to the methodology proposed by Lezama et al. [7], graded as low-to-mid level of maturity (technology readiness level) associated with WAAM. It is highlighted the predominance of journal research articles for most of the interpass temperature publications in the context surveyed. However, the maturity level will rise with the appearance of patents and open access news on the subject for most of the interpass temperature publications in the context surveyed. However, the maturity level will rise with the appearance of patents and open access news on the subject.
From welding technology [8], interpass temperature is defined as the temperature at which subsequent bead runs are deposited. In fact, for practical purposes, interpass temperature is used in welding procedures to limit the maximum/minimum temperature that the joint can be at before proceeding with the next weld pass. The minimal temperature of operation is in this case defined by the pre-heating temperature. These temperature figures aim at reaching a cooling rate range that provides safe microstructures and, therefore, mechanical performance for the application.
In the context of additive manufacturing (AM), the meaning of interpass temperature is not so clear. Firstly, the term “interpass” is generally used rather than “interlayer” (also common terminology in DED) to qualify the temperature to be measured because one layer can be developed by one or more deposition beads. Secondly, interpass temperature monitoring in AM aims more at proper layer shape (generally to assure the target preform width). There are a third aspect of AM interpass temperature not argued in current literature, which is related to the position where the temperature is measured. As seen in Figure 2, the AM interpass temperature could be measured by means of 4 position-related approaches. Approaches (a) and (b) present more similarities to the welding case, yet in AM they have the setback of having different measures according to the building height (layer). In this context, Wu et al. [9] advised that if the temperature measured at the substrate is taken to be as the interpass temperature, it will cause large errors. They argue that there is a large discrepancy between the temperature measured at the substrate and the actual interpass temperature, particularly if the dwell time between layers and/or deposition passes are short.
Approach (c) has the advantage of keeping track of heat accumulation and at the same time of being able to monitor the cooling rate in that position. Strictly speaking, approach (d) should not be classified as for interpass temperature, because the measurands are not related to interpass (between the previous and the subsequent passes), since the measurement is carried out during the ongoing pass deposition on the previous layer. If the position of measurement ahead of the pool is correct, this approach (named hereafter “forward interpass temperature”) may be the best choice, because the monitoring of the temperature will indicate the thermal condition to reach the target cooling rates and layer width, for a given parametrization. Notwithstanding, approaches (c) and (d) demands non-contact temperature probes. Hagqvist et al. [10] mention that contact measurement methods are impracticable because of the layer-by-layer approach of AM. Thus, the measuring of interpass temperature in WAAM must be accomplished with the ability of changing the measurement position according to the height of the previous layer. Wu et al. [9] further claimed that in-situ measurement of the layer surface temperature using non-contact techniques provides far more accurate and reliable data.
Figure 2:Different approaches to measure AM interpass temperature:
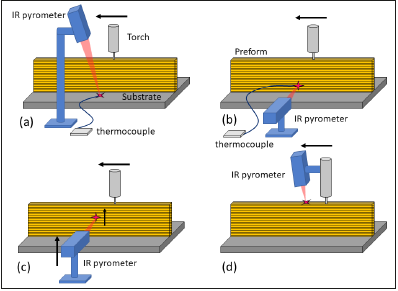
(a) Fixed point at the subtract (contact or non-contact probes);
(b)Fixed point at a given position of the preform lateral surface (contact or non-contact probes);
(c)Movable point in the upright position on the preform lateral surface (non-contact probes), keeping the same distance point-top surface;
(d)Movable point at the top surface (non-contact probes), ahead of the arc.
Unsteady or not well controlled interpass temperatures may lead to harmful consequences to the preforms. From experiments carried out by the authors, Figure 3 illustrates an example of walllike preforms WAA manufactured under a controlled forward interpass temperature (interpass idle times for natural cooling at the trajectory ends) and under an uncontrolled temperature (non-stop deposition). In this case, the interpass temperature was measured using the approach (d) of Figure 2. For the uncontrolled procedure, the forward interpass temperature increases as the layers are deposited due to heat accumulation. The negative impact of heat accumulation on preform geometry can be easily seen by means of a corresponding cross-sectional view, where its shape width increases as it is built up because of molten pool enlargement. In contrast, with controlled forward interpass temperature, the width remains very constant along the building height. Besides impairing geometry, heat accumulation could lead to preform collapse [11], excessive oxidation [12], distortion/residual stresses [13], coarse microstructure [14], etc. It is worth mentioning that these deleterious consequences are not limited to WAAM, being also reported for the other DED approaches, such as for Laser Metal Deposition – LMD [15].
Figure 3:Average forward interpass temperature and geometric profile from WAAM of aluminum alloy walls under IR-Pyrometry with controlled and uncontrolled interpass temperature approaches (both wall-like preforms were deposited with the same deposition parameters and number of layers).

IR Pyrometry: Advantages and Setbacks
According to Hagqvist et al. [10], due to the availability of infrared (IR) pyrometers with focusable optics, measurements with a small spot for high spatial resolution are an option, besides infrared/thermal cameras. Despite delivering a broad panorama, thermal cameras make data analysis harder since surface characteristics, and thus emissivity, vary over the examined area. Also, there is a higher risk of camera optics focusing plasma reflections, misleading the results. This risk is mitigated by using an IR pyrometer along with a focusing optical head that difficult stray reflections to hit the detector.
Hagqvist at al. [10] worked with LMD with wire. In WAAM there is an extra setback, which is related to the interference of the arc light because arc radiates the whole spectrum. In addition, the spectrum range of pyrometers is narrow (3 to 5μm) if compared with thermal cameras (8 to 13μm). The approach used by the authors (Figure 2), where the pyrometer focus is positioned ahead of the arc centerline, being the pyrometer head positioned in such a way that the incidence of IR radiations coming from the arc and molten pool is minimized by the its horizontal distance and by the torch nozzle configuration. This is intended to avoid the mentioned setback.
The setback regarding the use IR pyrometers is that an accurate temperature measurement requires knowledge of the object’s emissivity. Hagqvist et al. [10] argue that generally there are no data on temperature and wavelength dependency of emissivity for commercial alloys. Neither does the available data consider the surface oxidation, which is an inevitable consequence when heating/melting reactive metals in the presence of oxygen. Therefore, one of the most prominent sources of uncertainty in IR pyrometry is the estimation of the measurand surface emissivity.
Although there are several methods to determine emissivity, many of them are restricted to a laboratory scenario. Experiments performed by Brandt et al. [16] showed that surface emissivity can be estimated by means of a reference paint applied to the surface to be measured and by comparing the radiation from the uncoated surface with the radiation from the reference paint. Also, the emissivity can be estimated by an electrically heated cavity, which temperature is compared with that of the outside surface. Due to multiple reflections inside the cavity, the local emissivity is nearly 100 %. Nevertheless, the most common approach for adjusting the emissivity is by comparing the IR pyrometer temperature with a thermocouple data, as performed by Wu et al. [9].
In this work, emissivity was estimated in a similar way as described by Wu et al. [9]. However, as the IR point of incidence is somehow distant from the deposition pool, the determination of the trend of the measured temperatures as a function of the distance from the arc centerline (fitting curve) was proposed and applied. Therefore, for a given operational condition (WAAM parameters and perform geometry and material) the desired “forward interpass temperature” was obtained. Heat flux simulation is under development to make this task more generic.
More recently, the evolution of IR pyrometers has reached a state such as if two or more wavelengths are used, commonly called multicolor pyrometry, the emissivity factor can be eliminated provided that the ratio between emissivities in different spectral regions are known [17]. However, despite the higher costs, multicolor pyrometry requires that emissivity ratios are constant and do not change with temperature [10]. As revealed, despite the importance of monitoring the interpass temperature during DED AM, as highlighted for WAAM, the available methods are still under improvement.
Conclusion
The IR pyrometers with focusable optics are an option for non-contact interpass temperature monitoring with a high spatial resolution and, consequently, a powerful tool for WAAM performance control. The setback regarding the use of IR pyrometry is that an accurate temperature measurement requires knowledge of the object’s emissivity, which is quite hard to determine, yet possible by comparison with thermocouple measurement. Emissivity factor could be eliminated by using multiwavelength IR pyrometers, counting that emissivity ratios are constant and do not change with temperature. The interference from IR radiation from the WAAM heat source (arc) and the molten pool can be mitigated by targeting the IR ahead of the arc centerline.
Acknowledgement
The authors thank the Center for Research and Development of Welding Processes (Laprosolda) at Federal University of Uberlândia for the laboratory support.
Funding
This work was supported by the Brazilian Coordination for the Improvement of Higher Education Personnel (CAPES), through Finance Code 001, and by the Brazilian National Council for Scientific and Technological Development (CNPq), through grants 302863/2016-8 and 315092/2018-1.
References
- ASTM (2016) Standard guide for directed energy deposition of metals. ASTM Int ASTM F3187-16: 1-22.
- Rodrigues TA, Duarte V, Miranda RM, Santos TG, Oliveira JP (2019) Current status and perspectives on wire and arc additive manufacturing (WAAM). Materials 12(7): 1121.
- Cunningham CR, Flynn JM, Shokrani A, Dhokia V, Newman ST (2018) Invited review article: Strategies and processes for high quality wire arc additive manufacturing. Addit Manuf 22: 672-686.
- Pan Z, Ding D, Wu B, Cuiuri D, Li H, et al. (2018) Arc welding processes for additive manufacturing: A review. Trans Intell Weld Manuf pp. 3-24.
- Williams SW, Martina F, Addison AC, Ding J, Pardal G, et al. (2016) Wire + arc additive manufacturing. Mater Sci Technol 32(7): 641-647.
- Ding D, Pan Z, Cuiuri D, Li H (2015) Wire-feed additive manufacturing of metal components: technologies, developments and future interests. Int J Adv Manuf Technol 81(1-4): 465-481.
- Lezama-Nicolás R, Rodríguez-Salvador M, Río-Belver R, Bildosola I (2018) A bibliometric method for assessing technological maturity: the case of additive manufacturing. Scientometrics 117(3): 1425-1452.
- TWI (2019) Which is important preheat or interpass? Granta Park, Great Abington, Cambridge, UK, https://www.twi-global.com/technicalknowledge/ faqs/faq-which-is-important-preheat-or-interpass; 2019 [accessed 30 July 2019]..
- Wu B, Ding D, Pan Z, Cuiuri D, Li H (2017) Effects of heat accumulation on the arc characteristics and metal transfer behavior in wire arc additive manufacturing of Ti6Al4V. J Mater Process Technol 250: 304-312.
- Hagqvist P, Sikström F, Christiansson AK (2013) Emissivity estimation for high temperature radiation pyrometry on Ti-6Al-4V. Meas J Int Meas Confed 46(2): 871-880.
- Henckell P, Günther K, Ali Y, Bergmann JP, Scholz J, Forêt P (2017) The influence of gas cooling in context of wire arc additive manufacturing - A novel strategy of affecting grain structure and size. TMS Miner pp. 147-156.
- Xu X, Ding J, Ganguly S, Diao C, Williams S (2018) Oxide accumulation effects on wire + arc layer-by-layer additive manufacture process. J Mater Process Technol 252: 739-750.
- Wu B, Pan Z, Chen G, Ding D, Yuan L (2019) Mitigation of thermal distortion in wire arc additively manufactured Ti6Al4V part using active interpass cooling. Sci Technol Weld Join 24(5): 484-494.
- Wang JF, Sun QJ, Wang H, Liu JP, Feng JC (2016) Effect of location on microstructure and mechanical properties of additive layer manufactured Inconel 625 using gas tungsten arc welding. Mater Sci Eng A 676: 395-405.
- Bi G, Schu B, Gasser A, Wissenbach K, Poprawe R (2007) Development and qualification of a novel laser-cladding head with integrated sensors. Int J of Machine Tools and Manufacture 47(3-4): 555-561.
- Brandt R, Bird C, Neuer G (2018) Emissivity reference paints for high temperature applications. Meas J Int Meas Confed 41(7): 731-736.
- LumaSense (2019) Infrared Thermometer Handbook, https:// www.lumasenseinc.com/uploads/Products/Technology_Overview/ Technical_Literature_pdf/EN-Infrared-Thermometer_Handbook.pdf [accessed 30 July 2019].
© 2019 Americo Scotti. This is an open access article distributed under the terms of the Creative Commons Attribution License , which permits unrestricted use, distribution, and build upon your work non-commercially.
 a Creative Commons Attribution 4.0 International License. Based on a work at www.crimsonpublishers.com.
Best viewed in





.jpg)






 Editorial Board Registrations
 Submit your Article
 Refer a Friend
 Advertise With Us

.jpg)






.jpg)








.bmp)
.jpg)
.png)
.jpg)



.jpg)


.png)

.png)


.png)


