- Submissions

Full Text
Advancements in Case Studies
Compression Impression Technique for Fixed Prosthodontics: the Iskaros Technique
Maged Iskaros*
Department of Cariology, USA
*Corresponding author:Maged Iskaros, Department of Cariology, USA
Submission: February 13, 2019;Published: August 13, 2019

ISSN 2639-0531Volume1 Issue5
Abstract
There are so many ways and methods to take the final impression for fixed prosthodontics; but the fact that we need to capture all the details of the preparation and the entire finishing line (margins) remains unchanged and it’s the most crucial step of fabricating the restoration.
Introduction
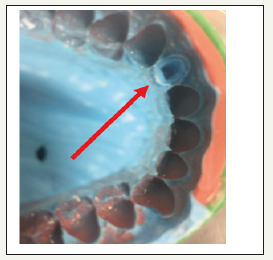
In a teaching facility, we need to consider an easy method and select the proper materials with reasonable costs to produce the satisfactory results. The student must also be able to perform the procedure with consistency yielding predictable results. We encounter a list of problems and challenges during the conventional method of taking the final impression, which consists of injection of the light body of PVS material around the preparation and loading of the rigid full arch tray with a heavy body at the same time, after obtaining complete dryness of the preparation (Figure 1).
Figure 1:Notice complete clear and dry margins around the preparation on tooth #10.
Methods and Procedure
This is a list of problems that students are facing when performing this procedure:
A. Most of the time there is a need for an assistant (4-hands) to prepare, dry, isolate and inject the impression material into the mouth. Too many steps require great accuracy, speed, efficiency and knowledge. In other words, too many variables lead to too many mistakes.
B. It is very hard to control bleeding (using chemicals, which may be harmful, such as epinephrine and other unneeded chemicals)
C. Too many tools (instruments), expenses, etc. cords, trays, syringes and tips, guns (using only one gun, 2 tips, less material).
D. Too much usage of impression material (incredible waste).
E. It is very unpredictable, which makes it difficult to teach, in addition to inconsistent results
F. Inaccurate results lead to remakes, which ultimately cause financial loss
Figure 2:Very well-defined finishing line on tooth #4.
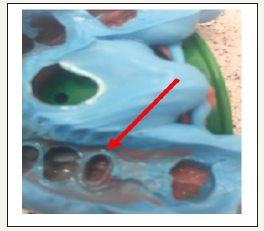
All of the above problems pushed me to suggest a simple method of taking final impressions, which I have been employing in a pre- and post- doctoral setting for the past 10 years (Figure 2). This technique has also been adopted by other prestigious dental teaching institutions. My technique presents the following advantages:
A. No need for Haemodent or Viscostat.
B. No need for an assistant.
C. No need for wasting materials (syringe tips, trays, etc.).
D. Less time-consuming, simple, teachable, consistent and leads to predictable results.
E. Only one cord used, or none.
F. Used for one unit or multiple units.
New technique outline in the pre-doctoral setting
A. Take a heavy putty of reprosil impression (only U shape) to capture only the occlusal surface. Less material is needed–only to cover occlusal surface of teeth (imprint). Also, easy to reintroduce the tray again for the final impression (Figure 3). This impression could be taken before preparation or after preparation (no accuracy needed in this step).
B. Then preparing the tooth after finishing placing the retraction cord (#1 for example) depending on the biotype. No haemostatic agent used. Cord will remain during the impression to keep the sulcus open and dry. The cord will look like a ring around the preparation but can’t be seen (under the gum). a. If there is bleeding it is advisable to use a piece of gauze 2x2 to be placed in the outer interproximal Mesial, Distal and press on it by the cord packer (leave it for 2-4min). This will stop the bleeding.
b. Final look and inspection of the field (preparation) before the final impression: All finishing lines and the margins have to be seen and visible before using the light body impression material.
c. If they are not seen:
a) Another piece of cord needs to be placed
b) Gingivectomy needs to be performed based on the clinical situation. If everything is clean, dry, visible, start loading the light body on the heavy body on the tray in a U-shape manner.
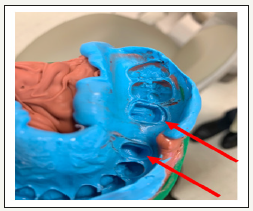
Never use material inside the patient’s mouth–all on the tray! Then place the tray back in the mouth followed immediately by pressing hard (Figure 4). By doing this, the light body will flow easily into the sulcus and capture the entire detailed preparation. Being compressed between the hard surface of the teeth and the 2 hard layers of the heavy body in the rigid tray, the fluid impression material creates a compression impression leading to results which are very: 1) accurate, 2) predictable, 3) cost effective, 4) time saving, 5) consistent, 6) very easy to teach and easy to learn and practice, 7) almost no remake (major saving for the dental school!) I have been using and teaching this technique in the last 30 years in my private practice, residency and in under graduate with consistency and very predictable results.
Figure 3:Nice, dry well- defined margins on tooth #12. Again, notice there is no haemodent or viscostat used in any of these impressions.
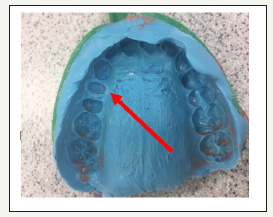
Figure 4:An impression for a 3-unit bridge. Teeth #12,13,14.
© 2018 Maged Iskaros. This is an open access article distributed under the terms of the Creative Commons Attribution License , which permits unrestricted use, distribution, and build upon your work non-commercially.
 a Creative Commons Attribution 4.0 International License. Based on a work at www.crimsonpublishers.com.
Best viewed in


.jpg)






 Editorial Board Registrations
 Submit your Article
 Refer a Friend
 Advertise With Us
.jpg)


.jpg)




.bmp)
.jpg)
.png)
.jpg)


.jpg)


.png)

.png)


.png)


